Part 1: Configuring anonymous share with samba server
To install the samba package,enter the following command:
sudo apt-get install samba samba-common
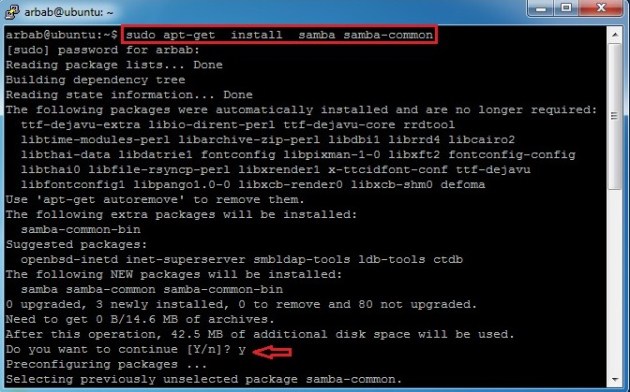
Check the version of installed samba software by using this command:
smbd --version

Also install these suggested packages for samba:
sudo apt-get install python-glade2 system-config-samba

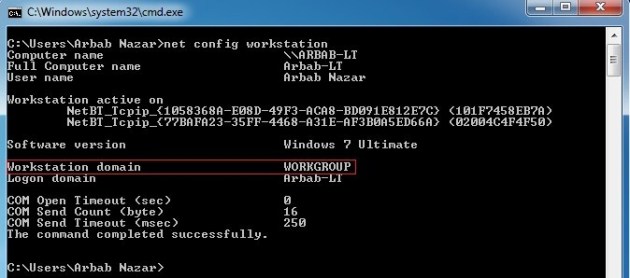
Go to your Windows machine and use this command in order to check the WORKGROUP name:
net config workstation

It will show the output, something like this:
Backup the smb.conf file, then delete it and create the new one:
sudo cp /etc/samba/smb.conf /etc/samba/smb.conf.bak
sudo rm /etc/samba/smb.conf
sudo touch /etc/samba/smb.conf
sudo nano /etc/samba/smb.conf

Add this, in your smb.conf file (or change it according to your requirement):
#======================= Global Settings =====================================
[global]
workgroup = WORKGROUP
server string = Samba Server %v
netbios name = ubuntu
security = user
map to guest = bad user
dns proxy = no
#============================ Share Definitions ==============================
[MyShare]
path = /samba/share
browsable =yes
writable = yes
guest ok = yes
read only = no

Save the smb.conf file and restart the service:
sudo service smbd restart

Access the samba share from windows (where ubuntu is the name of my samba server):

wao, we are able to access the samba share successfully 🙂

Let’s try to create something, inside the share folder:
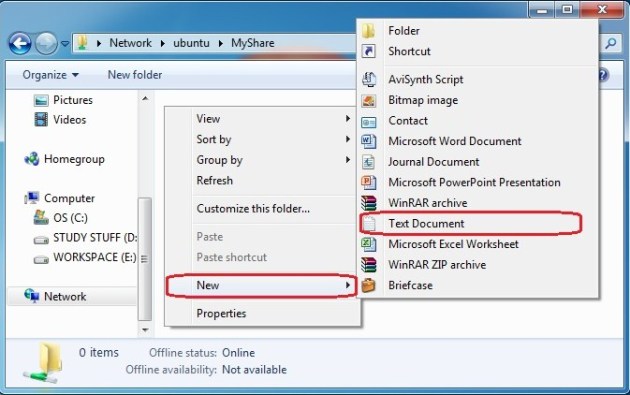
Error, we cannot create anything inside the share folder 😦

Check the current permission on the samba share:
cd /samba/
ls -l

Change it, in such a way that everyone can read and write it(Check it, that it is allowed in your environment or not):
sudo chmod -R 0777 share
ls -l

Try to create something again, inside the share folder:

Verify the newly created file on samba server:
cd share/
ls -l

Part 2: Add and manage users and groups
Add a group in your ubuntu server (in my case smbgrp):
sudo addgroup smbgrp

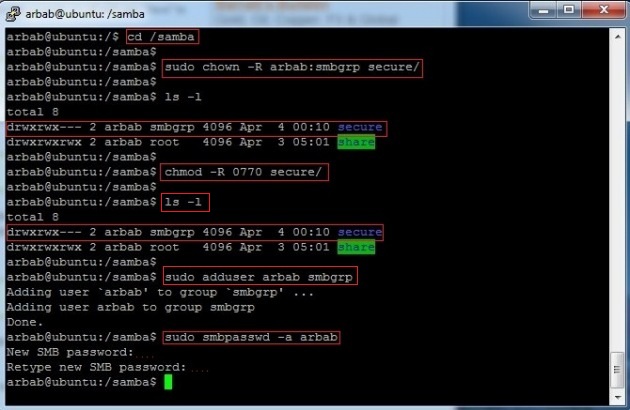
Create a new share, set the permission on the share ,add the user to the samba group and create samba password:
cd /samba/
sudo chown -R arbab:smbgrp secure/
ls -l
sudo chmod -R 0770 secure/
ls -l
sudo adduser arbab smbgrp
sudo smbpasswd -a arbab
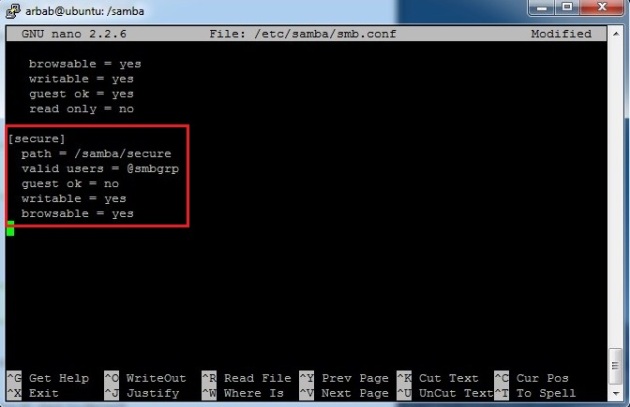
Add the newly created samba share in smb.conf file:
[secure]
 path = /samba/secure
 valid users = @smbgrp
 guest ok = no
 writable = yes
 browsable = yes
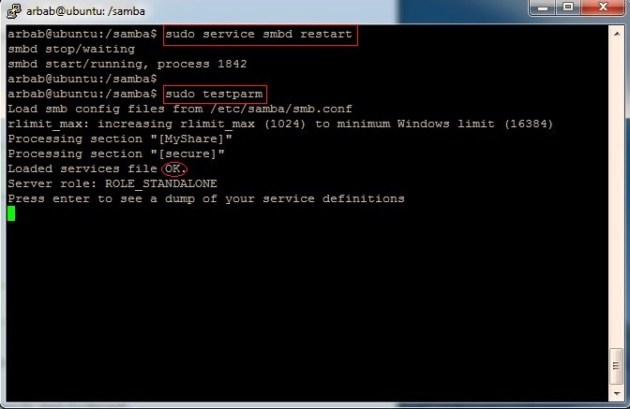
Restart the samba service and check the syntax error with testparm:
sudo service smbd restart
sudo testparm
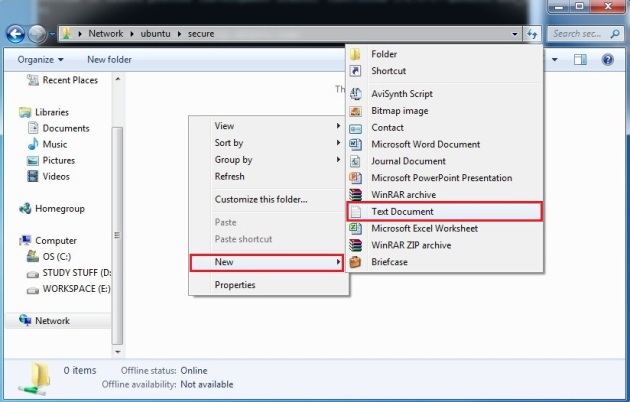
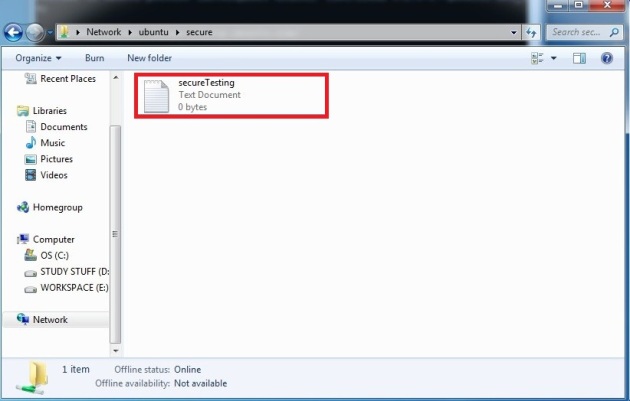
Testing from Windows Machine:

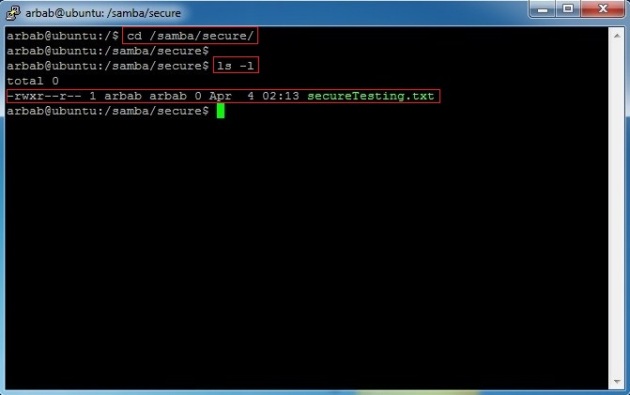
Verification from Ubuntu server:
cd /samba/secure/
ls -l
Hope this will help you!
Please Remember me in your prayers!
Enjoy 🙂


Pingback: How to Install Samba on Ubuntu 12.04 » » Mathew GoldsboroughMathew Goldsborough
I can’t seem to access the password protected share from Windows. The guest share is working fine but when I enter my samba username and password I get an error message in Windows. Any suggestions?
Erik, are you using the same username as you are using on windows system? for example, you have Erik account on your windows machine and you have created the same account on samba?
Because, I had the same problem, when i was using the same account on both!
I was clicking use another account and then typing in the administrator account which I had created a samba password for on the server but it wouldn’t let me in. However I managed to fix it by changing security = user to security = share.
Thanks for the response though.
Nice to hear that your are able to solve your problem
Pingback: [Ubuntu] 노트북에 삼바 서버 구성 | 재석
Hello, all steps worked without a problem, I’m new to Linux and this tutorial was perfect 🙂 Thank you very much!
I can’t seem to get through the \\Ubuntu step on the windows computer. Is there soemthing that I’m missing?
Can you tell me the error that you are getting?
machine says the path cant be found
please check that samba service is running on your server, check it’s status and also ping to your server from your client
Check the current permission on the samba share: I can not find SAMBA I get error saying File or Directory not found I can not find it anywhere on my Server
cd /samba/
ls -l
If you can’t find it on your system then most probably you didn’t create it, so create it and then set a permission on it. One more thing that there is difference between SAMBA and samba in linux world!
i found it a best solution for samba sharing. thank you very much for your best suggestion.
Just a prefect guide. Thank you very much
Thank you so much for this tutorial! I am new to using Linux as a file share/server, and have been going nuts for days trying to get Win7, WinXP, and Ubuntu to all play nice. Thanks to you, I just got the Ubuntu file share working, and can transfer files at the full network speed. Awesome!
Pingback: How to Install Samba on Ubuntu 12.04 « Mathew Goldsborough
This is a great tutorial. The best found over the net so far. Thank you very much, it helped me a big deal.
Make sure to add etc in front of
path = /samba/
So it will be:
path = /etc/samba
This will solve your all problems in newer ubuntu server versions 🙂
Make sure to add etc in front of
path = /samba/
So it will be:
path = etc/samba
(delete my previous post becuz it was /etc/samba and it was wrong, sorry )
in path [cd /etc/samba]
sudo chmod -R 0777 share
ls -l
This command doesn’t work
What is the problem?
I am having the same problem. in my case the system says that the directory doesn’t exist (I have tried both etc/ and not.
did you create the share directory?
like you create the directory under /etc/samba directory:
sudo mkdir /etc/samba/share
cd /etc/samba
Then run the command:
sudo chmod -R 0777 share
Great tutorial, Erik! Thanks! I for example, want access to my www files from my Windows box, so I did this:
sudo chmod -R 0777 /var/www/
ls -l
Note, this example is not secure – you should never chmod 777 your web pages folder! But I used this in my setup and it’s OK because I don’t get a lot of web traffic. Create a folder that you want to share files in – you don’t necessarily have to call it “Share” as in the example above.
Pingback: How to install Samba server on Ubuntu 12.04 | 世界是平的
I followed the instructions and it “almost” works. From the Win7 machine, no problems. But from the Ubuntu machine I see:
Network:
Windows Network:
WORKGROUP:
Windows Shares on your workgroup:
PC-USER:
{list of shared directories}
When I click on the one I want (called “Share)” of them I get:
Failed to open “Share”. Invalid argument.
All the std Win7 shares seem to be accessible ok. And the directory Share that I made is visible and accessible from other windows machines. It is visible from Ubunutu as rw-rw-rw-
Any thoughts?
Pingback: brownfox's Blog! » Blog Archive
Pingback: 胖狐狸 » Ubuntu12.04 Samba文件配置
This is solution for anyone was denied to enter ‘secure folder’ in Win 7 after put correct username & password.
For Win 7 and Win 8, you have to enter username & password, then it will denied you. Dont worry, you have to restart first you windows.
And try back after that. U will require to put username & password same as before, but for the second time, it will pass grant to you direct to your secure folder.
Thanks Rbgeek for this great & easiest tutorial ever about samba server!
Thank super explanation
I want to use samba as the domain controller to windows machines (xp/win 7). Is this enough? Do I need to do anything at windows side to set up user id/access policy etc.
Reblogged this on srengengeblog and commented:
Cara Install Dan Configurasi Samba Server di ubuntu 12.04
If you want to share without username and password place this at the end of smb.conf:
force user = pc-name
Were ‘pc-name’ is the name of your computer
Pingback: Virtuális gépen (Oracle VM) futó Ubuntu Server www könyvtárában lévő kód elérése Netbeans-ből. | urlcatalog
Pingback: Zugriff auf Windowsnetzwerk - Linux: Linux-Forum
When I want to install GUI it shows me a message: “E: unable to locate package system-config-samba” Does anyone know how to solve it?
Pingback: Virtuális gépen (Oracle VM) futó Ubuntu Server www könyvtárában lévő kód elérése Netbeans-ből. | Bejegyzések főleg az informatika területéről
Pingback: Fix Ubuntu E Unable To Locate Package Ntp Windows XP, Vista, 7, 8 [Solved]
Pingback: Installing the Samba server on Ubuntu using Ansible | Lazy Geek -:)
Pingback: Cara Instal Dns Server Di Ubuntu 14.04 | Kumpulan Cara dan Pengetahuan
Pingback: Cara Instal Dhcp Server | Kumpulan Cara dan Pengetahuan
Thanks rbgeek and may God Bless You indeed.
For the path to work make sure u create those directories if they are not yet created.
For Example; path = /samba/share
create the the directory as shown below;
mkdir /samba # then press enter#
mkdir /samba/share # then press enter#
Do the same for; path = /samba/secure
Since we have already created the directory called “samba”, we are now going to create the directory called “secure” inside the directory called “samba” as shown below,
mkdir /samba/secure # then press enter#
Pingback: Esh Notes | Eshlee Romero
Pingback: Connecting windows 10pc to Ubuntu 14.04.04 Samba Server - ubuntutextbook