Tag Archives: centos server

OpenVPN server on CentOS 6.4 behind NAT

This tutorial describes that how to configure the OpenVPN Server in CentOS 6.4 and clients in Windows XP/7.

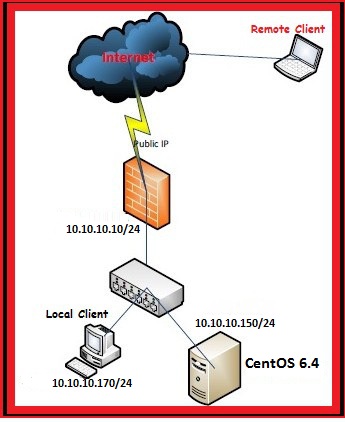
I am taking the scenario of SOHO network, which is protected by Firewall, we’ll implement the OpenVPN on internal CentOS 6.4 server to access the internal SOHO network (Server and PCs) through the internet from anywhere securely.

openvpn

Read more of this post

How to install VNC server on CentOS 6

VNC is a protocol that is used to share the desktop with other users/computers over the network/Internet.In order to share a desktop, VNC server must be install and configure on the computer and VNC client must be run on the computer that will access the shared desktop.

When we install the minimal copy of CentOS Server, it only gives us the “Command Line” interface.

But some people prefer GUI instead and for this they install Full version of Gnome on CentOS. Actually there is a better way and that is to install VNC. VNC provides a lightweight virtual desktop than full blown version of Gnome.

To run the VNC Server on CentOS, we have to install these required packages:

sudo yum groupinstall Desktop

sudo yum install tigervnc-server

sudo yum install xorg-x11-fonts-Type1

This is optional:

sudo yum install vnc

To start VNC Server on boot

sudo chkconfig vncserver on

To setup users’ VNC password:

vncpasswd

Edit the /etc/sysconfig/vncservers file:

sudo nano /etc/sysconfig/vncservers

Add the following to the end of the file:

VNCSERVERS="1:arbab"
VNCSERVERARGS[1]="-geometry 1024x600"
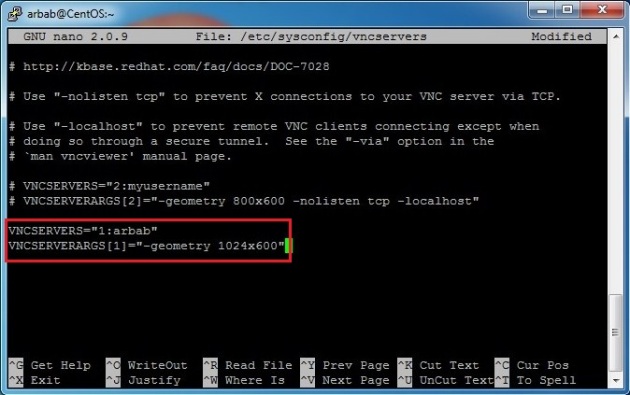
The iptables rules need to be amended to open the VNC ports:

sudo iptables -I INPUT 5 -m state --state NEW -m tcp -p tcp -m multiport --dports 5901:5903,6001:6003 -j ACCEPT
sudo service iptables save
sudo service iptables restart

Restart the VNC Server:

sudo service vncserver restart

Now kill the VNC Server:

vncserver -kill :1

Edit the xstartup file in .vnc directory:

nano .vnc/xstartup

Comment the last line and run the Gnome:

#twm & 
exec gnome-session &

Restart the service:

sudo service vncserver restart

Now, download VNCViewer onto our desktop computer from which we want to access the shared desktop. Connect using ServerIP/Name:1 (:1 is for the VNC server window), In my case it is centos:1.

Enter the password that we created using the vncpasswd command:
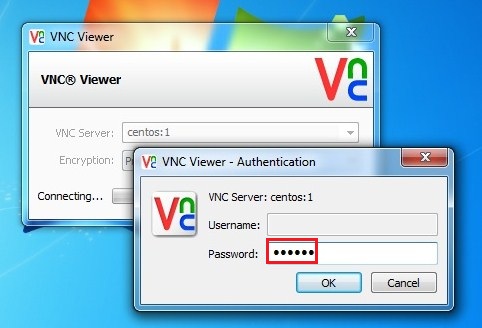
We now have GUI access to our server.

Ability to connect for multiple users:

Create a local user, using the following command:

sudo adduser ali

Create a password for newly created user:

sudo passwd ali

Switch to the newly created user and run vncpasswd command for it:

su ali
vncpasswd

Edit the /etc/sysconfig/vncservers file:

sudo nano /etc/sysconfig/vncservers

Add these lines for new user:

VNCSERVERS="1:arbab 2:ali"
VNCSERVERARGS[1]="-geometry 1024x600"
VNCSERVERARGS[2]="-geometry 1024x600"

Restart the VNC service:

sudo service vncserver restart
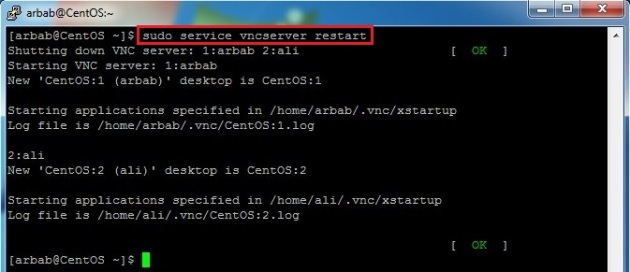
Kill the vncserver session for new user and edit the xstartup file:

su ali
vncserver -kill :2
cd ~
nano .vnc/xstartup

Modify the file so it looks like this:

#twm & 
exec gnome-session &

Restart the VNC service:

sudo service vncserver restart

Connect with newly created user using centos:2, Where centos is my server name:

Enter the password that we created using the vncpasswd command:

We now have GUI access to our server for newly created user.

Hope this will help you!

Please Remember me in your prayers!

Enjoy 🙂
How to find the Linux Distribution Name and Version

In this post, I will try to show you that how we can check the version of Linux (Debian, Fedora, Ubuntu, CentOS), a particular system is running. Sometime we login to the system but we don’t know that which Linux distribution is running on it, So in this post, we will try to find it by using the lsb_release command that displays certain Linux Standard Base(LSB) and distribution-specific information.

To show the release number of installed distribution:
lsb_release -r

To show the distributor ID:
lsb_release -i

 To show all of the above information:
lsb_release -a

To find Out the Kernel Version by using this command:
uname -mrs

Where:

Linux – Kernel name
3.2.0-24-generic – Kernel version
x86_64 – Kernel is 64-bit

Hope this will help you!

Please Remember me in your prayers!

Time synchronization on CentOS 6.2 using NTP

To install the ntp, just enter this command at the terminal:

sudo yum install ntp

To make the ntpd start at boot time, use this commands:

sudo chkconfig ntpd on

After installation, edit the default ntp configuration:

sudo nano  /etc/ntp.conf

Commented out/remove the default CentOS servers,you can add your own time-servers here to synchronize with, http://www.pool.ntp.org/zone/europe or http://www.pool.ntp.org/zone/north-america lists:

After you are done with the configuration, just start the ntp service:

sudo service ntpd start

To check if the NTP service is synchronizing:

sudo ntpq -pn

To check the synchronization log:

sudo tail -f /var/log/messages

Geeky Comparison with Windows clock after synchronization:

Hope this will help you!

Please Remember me in your prayers!

Python 2.7 on CentOS 6.2 with Setuptools

First check the python version that is currently install on CentOS 6.2:

python

Before installing the python, please install these packages:

sudo yum install gccgcc-c++.x86_64 compat-gcc-34-c++.x86_64 openssl-devel.x86_64 
zlib*.x86_64 wget make setuptool

Now download the Python 2.7 (In my case, I will download it in tmp directory):

cd /tmp/
wget http://www.python.org/ftp/python/2.7/Python-2.7.tar.bz2

Switch to the super user (root):

su 

Extract the downloaded Python 2.7 package:

tar -xvjf Python-2.7.tar.bz2

Move to the Python 2.7 directory and configure the package:

cd  Python-2.7
./configure

It’s time to actually build the binary from the source code:

make

Now it’s finally time to install the program:

make install

Edit the user .bash_profile file:

nano ~/.bash_profile

replace PATH=$PATH:$HOME/bin
with PATH=$PATH:$HOME/bin:/opt/python27/bin

Reload the .bash_profile:

source ~/.bash_profile
echo "/opt/python27/lib" > /etc/ld.so.conf.d/python27.conf
ldconfig

Check the Python version now 🙂

python

Now, we will install the setuptool and for this we need to fetch the setuptools from the website:

cd ..
wget http://pypi.python.org/packages/2.7/s/setuptools/setuptools-0.6c11-py2.7.egg

Run the setuptools using this command:

sh setuptools-0.6c11-py2.7.egg

Next, we will install the gevent:

yum install libevent.x86_64 libevent-devel.x86_64

easy_install-2.7greenlet


wget http://pypi.python.org/packages/source/g/gevent/gevent-0.13.0.tar.gz

tar -xvzf gevent-0.13.0.tar.gz

cd gevent-0.13.0

python2.7 setup.py install

Logout from root user and check the python version for user arbab:

exit
python

Hope this will help you!

Please Remember me in your prayers!

How to install Java 6 on CentOS 6.2

First, we will check that java is already install or not on our system?

java -version

As, we can see that the java is not install on our system, so we will downloads the Java binary installer from Oracle. (In this example, we will download & install the jdk, but the procedure is exactly the same for jre).

Transfer the downloaded file (jdk-6u32***) to the CentOS from Windows machine using WinSCP.

Now, move to the directory where you copy the jdk file(in my case, it is in tmp directory) and give execute permission to jdk file:

cd /tmp/
sudo chmod +x jdk-6u32-linux-x64-rpm.bin

Run the jdk file:

sudo ./jdk-6u32-linux-x64-rpm.bin

Apply the alternatives:

sudo alternatives --install /usr/bin/java java /usr/java/jdk1.6.0_32/bin/java 17000 

We are done 🙂

Check the installed version of java:

java -version


Hope this will help you!


Please Remember me in your prayers!


How to install Webmin on CentOS 6.2

Webmin is a web-based interface for system administration for Linux/Unix. You can setup user accounts, Apache, DNS,DHCP, file sharing and much more by using any modern web browser.

Before installing the Webmin,disabled the SELinux:

Make SELINUX=disabled:

Restart the Server!!

First, we need to install the dependencies with this command:

sudo yum install perl

Also, install the wget:

sudo yum install wget

Now, we need to download the Webmin rpm package from Sourceforge (I download it  in my home directory):

wget http://prdownloads.sourceforge.net/webadmin/webmin-1.580-1.noarch.rpm

Then just run the following command:

sudo rpm -U webmin-1.580-1.noarch.rpm

Webmin is installed now and you will be able to access it via a browser using, http://server-ip:10000. In my case it is,http://CentOS:10000.

Configure the iptables rule in order to allow access to the Webmin:

sudo iptables -I INPUT 4 -m state --state NEW -m tcp -p tcp --dport 10000 -j ACCEPT
sudo service iptables save

Now access Webmin via a browser using, http://server-ip:10000(In my case it is,http://CentOS:10000):

After login, Webmin main page will show you the summary of your server:

Hope this will help you!

Please Remember me in your prayers!

InterVLAN Routing using CentOS with 1 Interface

Scenario:
  • Router: CentOS Server with 1 network card.
  • Clients: 2 WindowsXP in VLAN10,1 Ubuntu and 1 CentOS in VLAN20.
  • Switch: Cisco 2960
Cisco 2960 Switch Configuration:
interface FastEthernet0/1
description CONNECTED TO CentOS ROUTER
switchport mode trunk
!
!
!
interface FastEthernet0/5
description WINXP-1
switchport access vlan 10
switchport mode access
!
interface FastEthernet0/6
description WINXP-2
switchport access vlan 10
switchport mode access
!
!
!
interface FastEthernet0/15
description UBUNTU CLIENT
switchport access vlan 20
switchport mode access
!
interface FastEthernet0/16
description CentOS CLIENT
switchport access vlan 20
switchport mode access
CentOS Router Configuration:

First, we need to disable the SELinux:

sudo nano /etc/selinux/config

Change SELINUX from enforcing to disabled:

To configure the base interface(in my case, eth0):

sudo nano /etc/sysconfig/network-scripts/ifcfg-eth0

It should have at least the following elements:

DEVICE=eth0 
BOOTPROTO=none   #if it didn’t work then use static
ONBOOT=yes 
TYPE=Ethernet

To setup a VLAN10, on eth0, then we should create a file ifcfg-vlan10 inside /etc/sysconfig/network-scripts/:

ifcfg-vlan10 should have following elements:

Again to setup a VLAN20, on eth0, then we should create a file ifcfg-vlan20 inside /etc/sysconfig/network-scripts/:

ifcfg-vlan20 should have following elements:

To enable ip forwarding, edit /etc/sysctl.conf file:

sudo nano /etc/sysctl.conf

Change net.ipv4.ip_forward from 0 to 1:

Restart the Networking service:

sudo service network restart

Use the ifconfig command to check the newly created vlan interfaces:

ifconfig

To forward the traffic between the vlans, we should configure the iptables:

sudo nano /etc/sysconfig/iptables

Add these two lines (place them according to your iptables file configuration):

-A FORWARD -i vlan10 -o vlan20 -m state --state NEW,RELATED,ESTABLISHED -j ACCEPT
-A FORWARD -i vlan20 -o vlan10 -m state --state NEW,RELATED,ESTABLISHED -j ACCEPT

Test from WinXP-1:

Test from WinXP-2:

Test from Ubuntu Client:

Test from CentOS Client:


Hope this will help you!


Please Remember me in your prayers!