Monthly Archives: May 2012

OSPF routing between Ubuntu and CentOS using Quagga

Topology:

Scenario:

  • Routers: 1 Ubuntu Linux with 2 nics, 1 Centos Linux with 2 nics.
  • Clients: 2 Windows 7 with 1 nic.

IP Details:

All the Routers in this scenario have a default password of “zebra“.

UbuntuRouter:

  • eth0: 192.168.10.1/24
  • eth1: 10.10.10.1/24

CentOSRouter:

  • eth0: 192.168.10.2/24
  • eth1: 172.16.10.1/24

Clients:

  • Dektop: 172.16.10.50/24
  • Laptop: 10.10.10.50/24

Read more of this post

How to block facebook in Mikrotik using L7 Protocols (Layer 7)

In Some Scenarios , We May need to Block Facebook Social Website or some others …In this tutorial, I will show you, how to achieve this goal using L7 (Layer7).

This tutorial consists of two parts:

1- Block facebook website for everyone on local network.

2- Allow facebook for specific host(s) and block for others on local network.

1- Block facebook website for everyone on local network.

First we check that Facebook is currently working on our local network or not?

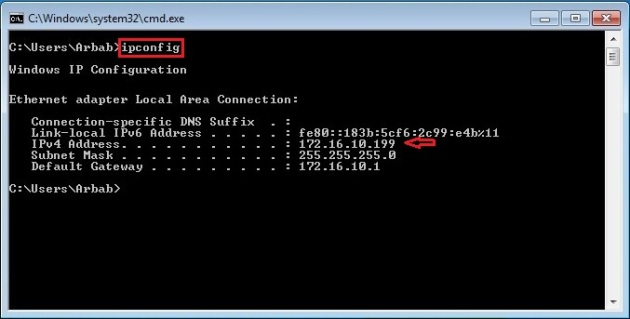
Check the IP address of our client?

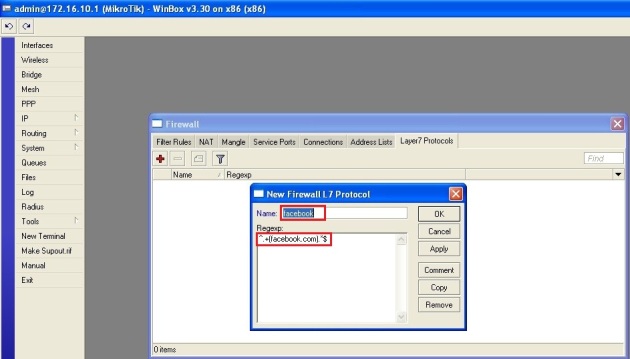
We need to create new Regexp rule at Layer7 Protocols, in order to block the facebook for our local network.

To achieve this goal, please follow these steps:

^.+(facebook.com).*$

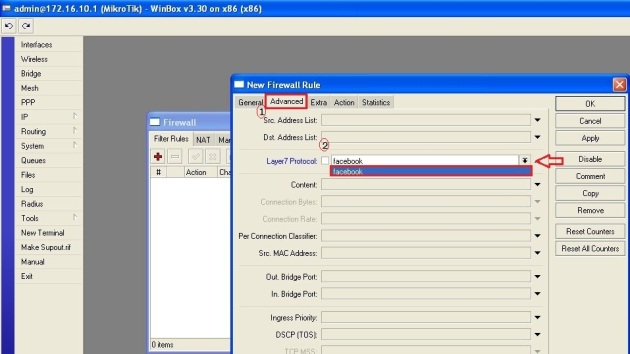
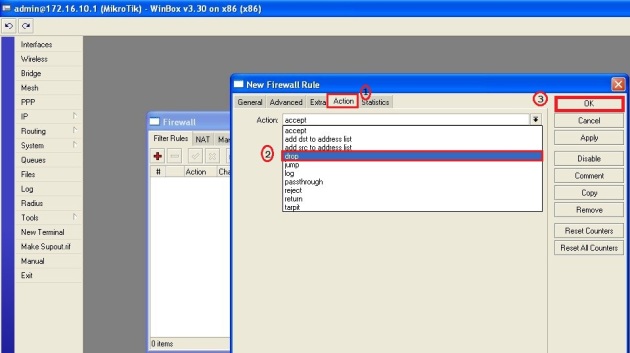
Now, we need to create Filter Rule, using these steps:

Now test the rule, that we just created:

Try also on 2nd client (172.16.10.199/24):

Check that it only block facebook or other websites also?

Oh yes, our rule is working perfectly 🙂

2- Allow facebook for specific host(s) and block for others on local network.

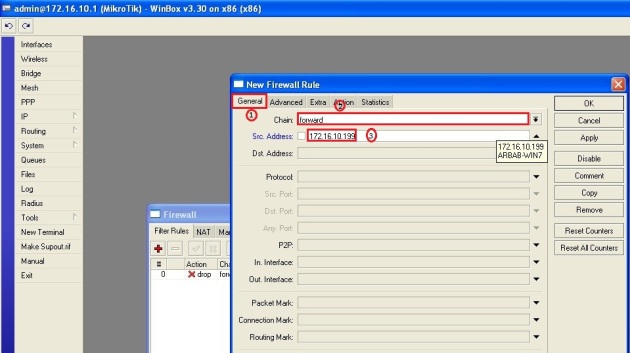
Now, we want to allow facebook for 2nd client (172.16.10.199/24) but still want to block it for other host(s).

To accomplish this goal, we need to create a second Filter rule, to do this, please follow these steps:

Move this rule at the top:

Test this rule on 2nd client (172.16.10.199/24):

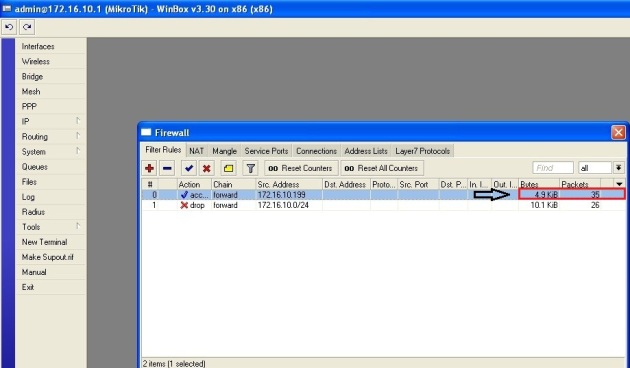
Verify the rule on Mikrotik:

Verify that, facebook is still blocked for other host(s) on the local network:

Verify the rule(s) on Mikrotik:

Drop packets rate are incremented!

We can do the same for youtube or any other website!

Hope this will help you!

Please Remember me in your prayers!

Enjoy 🙂

How to hard reset the Linksys Router!

Today, when i try to access the Linksys WRT120N wireless router  by using it’s default ip http://192.168.1.1,  it took me to the recovery console. It was doing so because the firmware in the router had developed some error & it was asking to replace the firmware for it.

Please follow these steps to fix this problem:

1. Let’s start pressing the RESET button with the power cable connected to the device.

2. After 30 seconds to Step 1, disconnect the power cable without releasing the reset button.

3. After 30 seconds to Step 2, reconnect the power cable without releasing the reset button.

4. After 30 seconds to Step 3, release the reset button.

5. Disconnect the power cable from the unit & reconnect it after another 30 seconds.

Hope this will help you!

Please Remember me in your prayers!

How to install Java 6 on CentOS 6.2

First, we will check that java is already install or not on our system?

java -version

As, we can see that the java is not install on our system, so we will downloads the Java binary installer from Oracle. (In this example, we will download & install the jdk, but the procedure is exactly the same for jre).

Transfer the downloaded file (jdk-6u32***) to the CentOS from Windows machine using WinSCP.

Now, move to the directory where you copy the jdk file(in my case, it is in tmp directory) and give execute permission to jdk file:

cd /tmp/
sudo chmod +x jdk-6u32-linux-x64-rpm.bin

Run the jdk file:

sudo ./jdk-6u32-linux-x64-rpm.bin

Apply the alternatives:

sudo alternatives --install /usr/bin/java java /usr/java/jdk1.6.0_32/bin/java 17000 

We are done 🙂

Check the installed version of java:

java -version


Hope this will help you!


Please Remember me in your prayers!


How to install Webmin on CentOS 6.2

Webmin is a web-based interface for system administration for Linux/Unix. You can setup user accounts, Apache, DNS,DHCP, file sharing and much more by using any modern web browser.

Before installing the Webmin,disabled the SELinux:

Make SELINUX=disabled:

Restart the Server!!

First, we need to install the dependencies with this command:

sudo yum install perl

Also, install the wget:

sudo yum install wget

Now, we need to download the Webmin rpm package from Sourceforge (I download it  in my home directory):

wget http://prdownloads.sourceforge.net/webadmin/webmin-1.580-1.noarch.rpm

Then just run the following command:

sudo rpm -U webmin-1.580-1.noarch.rpm

Webmin is installed now and you will be able to access it via a browser using, http://server-ip:10000. In my case it is,http://CentOS:10000.

Configure the iptables rule in order to allow access to the Webmin:

sudo iptables -I INPUT 4 -m state --state NEW -m tcp -p tcp --dport 10000 -j ACCEPT
sudo service iptables save

Now access Webmin via a browser using, http://server-ip:10000(In my case it is,http://CentOS:10000):

After login, Webmin main page will show you the summary of your server:

Hope this will help you!

Please Remember me in your prayers!

How to install Samba server on CentOS 6

Part 1: Configuring anonymous share with samba server

To install the samba package,enter the following command:

sudo yum install samba samba-client samba-common

Check the version of installed samba software by using this command:

smbd --version

Configure the samba service, so that, it will start automatically at boot time:

sudo chkconfig smb on
sudo chkconfig nmb on

Disable the SELinux:

sudo nano /etc/selinux/config

Change SELinux from enforcing to disabled:

SELINUX=disabled

Add these Iptables rules, so that samba will work perfectly:

sudo iptables -I INPUT 4 -m state --state NEW -m udp -p udp --dport 137 -j ACCEPT
sudo iptables -I INPUT 5 -m state --state NEW -m udp -p udp --dport 138 -j ACCEPT
sudo iptables -I INPUT 6 -m state --state NEW -m tcp -p tcp --dport 139 -j ACCEPT
sudo service iptables save

Restart the Server!!!

Go to your Windows machine and use this command in order to check the WORKGROUP name:

net config workstation

It will show the output, something like this:

Backup the smb.conf file, then delete it and create the new one:

sudo cp /etc/samba/smb.conf /etc/samba/smb.conf.bak
sudo rm /etc/samba/smb.conf
sudo touch /etc/samba/smb.conf
sudo nano /etc/samba/smb.conf

Add these lines, in your smb.conf file (or change it according to your requirement):

#======================= Global Settings =====================================
[global]
 workgroup = WORKGROUP
 security = share
 map to guest = bad user
#============================ Share Definitions ==============================
[MyShare]
 path = /samba/share
 browsable =yes
 writable = yes
 guest ok = yes
 read only = no

Save the smb.conf file and restart the service:

sudo service smb restart
sudo service nmb restart

Access the samba share from windows (where centos is the name of my samba server):

wao, we are able to access the samba share successfully :-)

Let’s try to create something, inside the share folder:

Error, we cannot create anything inside the share folder :-(

Check the current permission on the samba share:

cd /samba/
ls -l

Change it, in such a way that everyone can read and write it(Check it, that it is allowed in your environment or not):

sudo chmod -R 0777 share
ls -l

Try to create something again, inside the share folder:

Verify the newly created file on samba server:

cd share/
ls -l

Part 2: Add and manage users and groups

Add a group in your CentOS server (in my case smbgrp):

sudo groupadd smbgrp

Create a new share, set the permission on the share:

cd /samba/
sudo mkdir secure
sudo chown -R arbab:smbgrp secure/ 
ls -l 
sudo chmod -R 0770 secure/
ls -l

Add the user to the samba group and create samba password:

sudo usermod -a -G smbgrp arbab
sudo smbpasswd -a arbab

Edit the smb.conf file:

sudo nano /etc/samba/smb.conf

Add the newly created samba share in smb.conf file:

[Secure]
path = /samba/secure
 valid users = @smbgrp
 guest ok = no
 writable = yes
 browsable = yes

Restart the samba service:

sudo service smb restart
sudo service nmb restart

Check the syntax error with testparm:

sudo testparm

Testing from Windows Machine:

Verification from CentOS server:

cd /samba/secure/
ls -l 

Hope this will help you!

Please Remember me in your prayers!

Enjoy :-)


Configure Mikrotik DHCP to assign ip address to only authorized client(s)

Scenario:

Mikrotik is working as dhcp, dns, and default gateway for local network.

Extra Requirement:

Mikrotik only assign ip address(es) to authorized client(s) in our local network!

Here are the steps to achieve this requirement:

Connect to the Mikrotik router using it’s ip address through web browser:

Click on the button, select the ip address of Mikrotik, enter username and password, then click Connect:

IP —>DHCP Server

From the Leases tab, select the client(s), which are authorized to take ip address from Mikrotik router (in future) and then click Make Static:

Move to the DHCP tab and double-click on the DHCP Server and select the static-only from Address Pool drop down menu:

After that, only authorized client(s) will get ip address from Mikrotik. If you want that new client get an ip address from Mikrotik, then you can select the dhcp_pool1 from Address Pool drop down menu. After that Mikrotik will assign an ip address to new client, make this ip address to static (as described above) and select static-only again in order to disallow ip address assignment to unknown client(s).

Hope this will help you!

Please Remember me in your prayers!

Automatic backup from Ubuntu Server with Rsync

Scenario:

2 Ubuntu Server: 1 is named as tendo-Srv with an ip address of 192.168.1.190, from which we want to take backup and 1 is named as tendo-backup with an ip address of 192.168.1.177, on which we want to place our backup. But we want all this process automatic, at a defined time/ interval.

Generate the ssh key pair on tendo-Srv:

ssh-keygen

Read more of this post

Mikrotik as Gateway

Note: This is not the best tutorial on Mikrotik, but it is one of easiest tutorial to configure Mikrotik as gateway 🙂

Scenario:

In this scenario, Mikrotik will work as dhcp, dns, and default gateway for local network.

Local Network : 172.16.10.0/24

Public: 192.168.1.0/24 (In this scenario)

I assume that you already install the fresh copy of mikrotik  on any low end (P III, P IV or whatever) machine. Default username is “admin” and there is no password , by default.

Login to the Mikrotik router:

After login, you will see the screen something like this:

After login, first thing we need to do is to change password:

password

Check the interface(s) Setting by using this command:

interface print

Change the interface(s )name by using these commands:

interface set 0 name=WAN
interface set 1 name=LAN

Now, check the interface(s) again:

interface print

Assign the ip address to LAN interface:

ip address add address=172.16.10.1/24 interface=LAN

Assign the ip address to WAN interface:

ip address add address=192.168.1.169/24 interface=WAN

Now, check the ip address setting:

ip address print

Add the default route using this command:

ip route add gateway=192.168.1.1

Check the routing table:

ip route print

DNS setup on Mikrotik:

ip dns set primary-dns=8.8.8.8 secondary-dns=4.2.2.2
ip dns set allow-remote-requests=yes 

DNS settings check:

ip dns print

DHCP Configuration:

ip dhcp-server setup

Configuration of NAT on Mikrotik:

ip firewall nat add chain=srcnat action=masquerade out-interface=WAN

Testing from one of the Local Network’s Client:

Hope this will help you!

Please Remember me in your prayers!